


PSYCHO MOM - texturing by Patrasciuc Cristian
Psycho Mom PART 2: texturing
PSYCHO MOM project overview by Patrasciuc Cristian - PART 2TexturingLet's pass to the next step (the most important of this project). First I set up the UV's (only planar, box or cylindrical). This is like a sketch, because after I'll paint the textures the UV's will be adjusted in order to give the best result. Here is a screen shot with the UV's after finishing the texturing process. You can see that they are stretched or damaged in some places, but this won't be seen in the final image.

The texture painting process is quite similar for all the objects, so I'll explain it only for the back wall, the one with a window on it. So, first of all set the UV to planar, then export the wire frame. You can either take a snapshot of the view port (if it is a planar UV) or use the Texporter plug in.

After that, just take the file into your favorite painting software (in this case it was Photoshop) and start painting over it. I started painting by taking a nice wall texture from www.environment-textures.com and put it as the base layer. 
I also reduced the opacity of the layer that contains the wire frame so I can see what I'm painting and where I'm painting. 
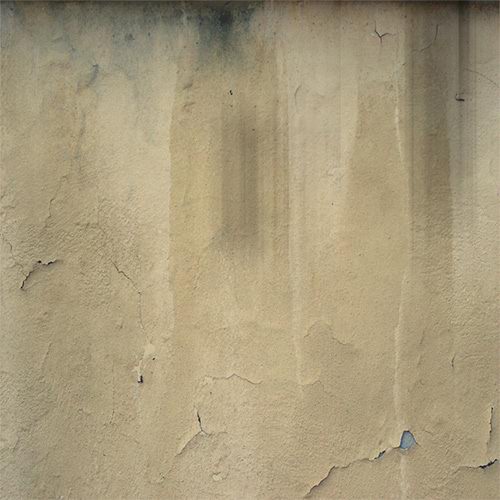
From now on it's all up to the artistic sense and the imagination of the painter. I wanted to make the wall a brown-yellow color, so I started by creating a new layer and fill it with the desired color tone.
Then I changed the blending mode to 'Multiply' and reduced the Opacity to 70%.
With an grayscale image, or just by using the Dodge and Burn tools make some small tone changes to add a bit of randomness to your wall texture. This also gives a bit of very fade dirt.
Create a new layer and make some black random brush strokes in the places where you want to add dirt. I've added dirt in the wet places, where it can naturally be found (to give realism to the picture): below the window and in the dark corners where the light can't reach. After sketching a bit on the image, motion blur your last created layer so it looks like wet dirt that is going down the wall.
In the end, create another layer and paint the 'sharp' dirt, the 'detailed' dirt, using custom brushes or reference pictures. Don't forget to take a look at the wireframe layer so you won't paint dirt in a wrong place.
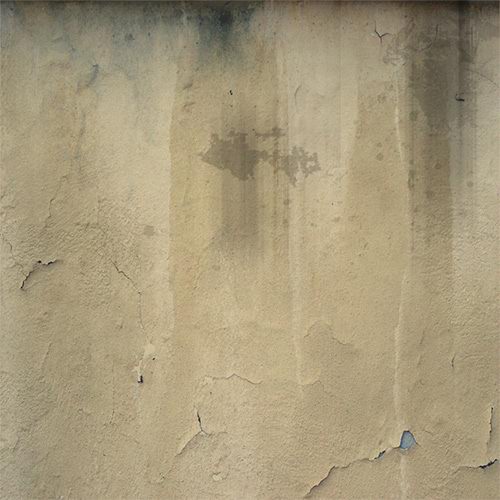
After the painting is finished remove the wire frame layer and you'll have the texture. From now on you can 'extract' bump maps, specular maps, etc. by just converting the texture to grayscale and adjusting the brightness/contrast.The rest of the textures were done in the same way: capture the wire frame and take it into Photoshop, put a basic texture (I used the ones fromwww.environment-textures.com), add some dirt layers and then remove the wireframe-layer.
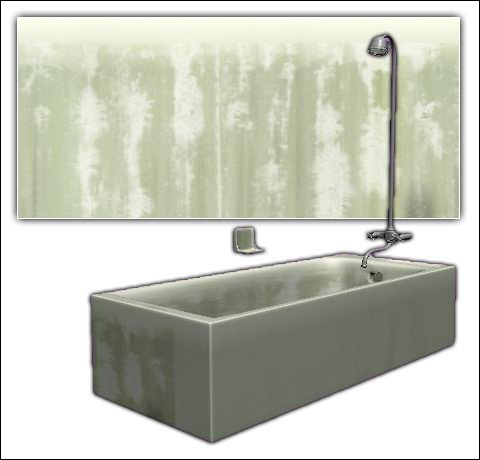
Painting the blood it's just like painting dirt, so I won't bore you with the same explanations. Anyway, there is a one more little thing I would like to speak about: the texturing of the mirror. As you can see in the following image I used two maps for it. First, I've painted the dirt and the blood text leaving the background white (here will be the reflection of the mirror). Then, I made a second map that I used as a mask in the diffuse and reflection slots. I've added other textures from my scene in the following image to show you how they were painted and to help you understand the process better.

I've spent a lot of time for this stage, but in the end I was very pleased by the result, so ... it worths.
Lighting and Rendering
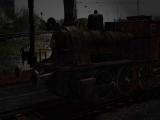
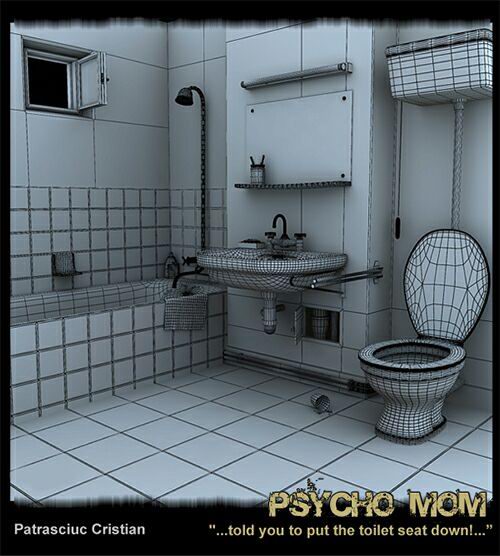
There is not much to say about the lighting and rendering process. It's very simple. I've only put a rectangular VRayLight to fit the neon, play a little with its intensity and then let VRay compute the GI. The final image was rendered using Adaptive QMC method with min. subdivisions set to 2 and max. subdivisions set to 3. For the anti-aliasing filter I usually choose Catmull-Rom, because I like my picture to have sharp edges. That's all from 3D Studio Max. It's work is done. At this stage, I took the final image in Photoshop and made the post-processing. I adjusted the brightness/contrast a little bit, painted more dirt in some places, added the border and the author's name, etc. So, here you go! This is the final result and the wire frame of the scene.

ConclusionThese were the main steps in creating the "Psycho Mom" image. I hope you enjoyed it. If you have any questions, critics or comments don't hesitate to contact me.
(c) Patrasciuc Cristian, http://calligrapha.go.ro, calligrapha@gmail.com
Lighting and Rendering
There is not much to say about the lighting and rendering process. It's very simple. I've only put a rectangular VRayLight to fit the neon, play a little with its intensity and then let VRay compute the GI. The final image was rendered using Adaptive QMC method with min. subdivisions set to 2 and max. subdivisions set to 3. For the anti-aliasing filter I usually choose Catmull-Rom, because I like my picture to have sharp edges. That's all from 3D Studio Max. It's work is done. At this stage, I took the final image in Photoshop and made the post-processing. I adjusted the brightness/contrast a little bit, painted more dirt in some places, added the border and the author's name, etc. So, here you go! This is the final result and the wire frame of the scene.
ConclusionThese were the main steps in creating the "Psycho Mom" image. I hope you enjoyed it. If you have any questions, critics or comments don't hesitate to contact me.
(c) Patrasciuc Cristian, http://calligrapha.go.ro, calligrapha@gmail.com